Rusty Black vs. Gunmetal: What's the Difference?
I'll admit when I first heard about the Rusty Black finish being offered at B'Sue Boutiques, I thought it was just another name for gunmetal, a finish I've used and liked.
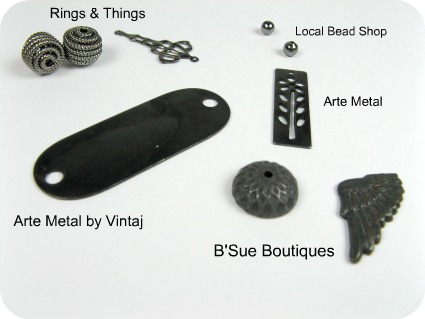
When my rusty black samples from B'Sue arrived, I found that they looked different than I expected. I pulled out a few of my gunmetal and other dark metal pieces to see if I could show you the difference.
The pieces from Rings & Things and my local bead shop are definitely shiny and have a dark, silvery finish. The Arte Metal by Vintaj is a mix—the bracelet blank in a matte finish, while the flower piece does have a shine to it (although it doesn't show in the photo). Both pieces are a dark, solid black.
The two pieces from B'Sue Boutiques, however, are a faded black with a tiny bit of dark brown showing through. The closest thing I can compare it to is a chalkboard that's seen some love in the classroom. These would be cool all by themselves, but you can also buff some of the black color away to reveal the coppery tones underneath.
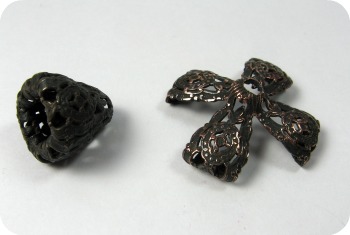 Before and After
Pictured here are two bead caps with the Rusty Black finish. The one left is untouched; the second one shows what the finish looks like if you rub a bit off with fine steel wool. (I've also pulled that bead cap apart with pliers so that it looks more like a cross or flower.) You can see the pretty coppery tones underneath. I decided I'd try two projects, one leaving the finish as-is and the other showing the coppery highlights.
The Creepy
My first thought when this black bird foot fell out of the package: Eeeeeewwwwww!
But then when I saw the wings, I immediately thought that the foot and a  wing would make a nice pair of Halloween earrings. (Okay, maybe nice isn't exactly the right word.)
Neither piece had a hole. I used my metal punch to add a hole to the foot, which wasn't the right tool. The metal's just a touch too thick. I was able to punch the hole but then the metal foot wouldn't come off the hole punch right away. So, don't do that! (Especially don't do it with a claw-shaped piece. Trust me, you don't want to have to explain to anyone in your household what a claw is doing on the end of your pliers.)
A better method (which I tried on the wing) is to use a hand drill.
I didn't buff these pieces because I wanted to keep their black look. These earrings are so simple, but I'm very proud of them because they are so far out of my comfort range as far as subject/theme. I feel just like those good-girl actresses who enjoy playing villains occasionally. Boo!
The Cute
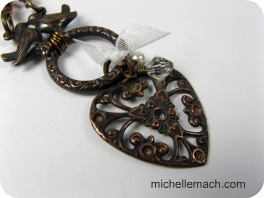
The filigree heart, ring, and pair of birds were much more in sync with my natural design style. I love the romantic look of these pieces, especially after I removed some of the black to show the coppery tones underneath. So pretty!
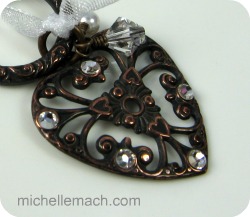
The divots in the heart pendant made me immediately think about adding flat-backed crystals. I asked my friend (and beader extraordinaire) Kristal Wick to refresh my memory about what type of glue to use to adhere them. She recommended Devon 2-part epoxy, which you can find at your local hardware shop. (I found mine at Lowe's.) The crystals are teeny-tiny—maybe 2mm. You'll probably need tweezers to place them just so.
Left: Before (without crystals) Right: After (with crystals)
 |
 |
The necklace design is simple. I connected the heart and the ring and wirewrapped the birds to the top of the ring, making a fairly long focal. From my own stash, I added crystal and pearl dangles, a few pearl and crystal beads, and two strands of chain, one copper and one antiqued brass. I used a copper filigree flower box clasp. Sweet!
The Verdict
I'm not giving up gunmetal, but I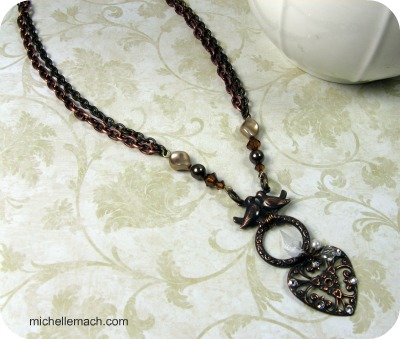 like having another option for dark metals. I love how I was able to get two completely different looks from this same rusty black finish. It's very versatile! I have a few more pieces that I'm playing with, including (believe it or not) the spider and the fly. That will be a literary-inspired Halloween piece. (Trust me, it's a poem, not just a Rolling Stones tune.)
I'd love to hear your suggestions about what to do with the
bead caps near the top of this post. I like the pulled-out and buffed
piece, but I'm a little stumped. I suppose I'll turn it into a necklace
pendant, but I'm not really sure what the next step is yet, so it's
just sitting on my work table waiting for inspiration to strike. Your
thoughts are welcome!
P.S.
After I finished writing this post, I read B'Sue's post on this finish. I didn't realize it was nickel-free. As someone who is allergic to nickel jewelry, I now love this finish even more!